
Introduction
Sensitive data often makes its way into logs. Though most of the time unintentional, these incidents have the potential to do a lot of damage, as they usually involve exposure of API keys, passwords, and customer data that can give attackers access to critical business data or put companies at compliance risk. This is why it’s important for organizations to be proactive about securing their logs. Because identifying sensitive data is not an easy task, we at Nightfall built a plugin for Fluent Bit. In this tutorial, we will go over how to set up Fluent Bit and the Nightfall plugin to process, forward, and secure your logs.
Setting Up Your Nightfall Developer Platform Policy
If you do not have a Nightfall account, you can sign up for free here. Once you have an account, navigate to Detection Engine > Detection Rules where you can create a detection rule with which you can secure your logs. Nightfall defines a detection rule as an aggregation of detectors: for example, {“credit card number” or “social security number”}.

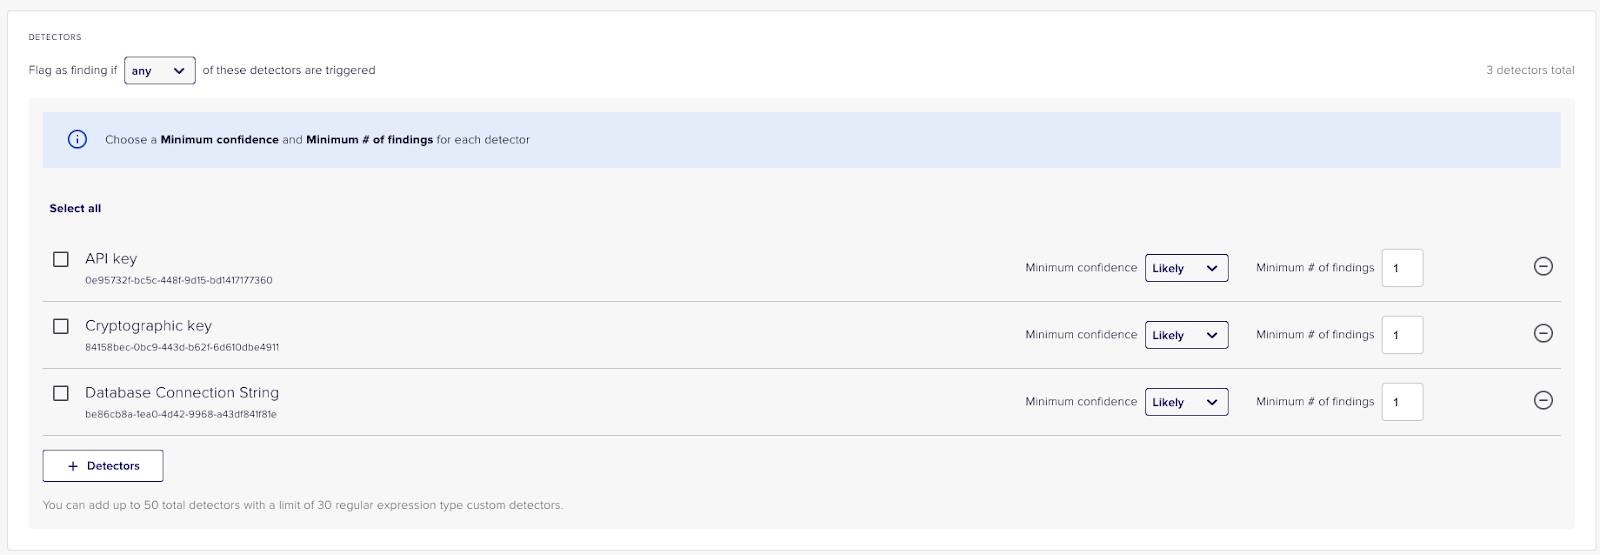
A good starting detection rule for scanning your logs could include the API key detector, database connection string detector, and cryptographic key detector, like so:
After you have created your detection rule(s), navigate to Developer Platform > Overview where you can create an API key and a Developer Platform Policy that will power the Nightfall plugin. Nightfall uses policies to describe how our platform should respond when a detection rule violation is triggered.
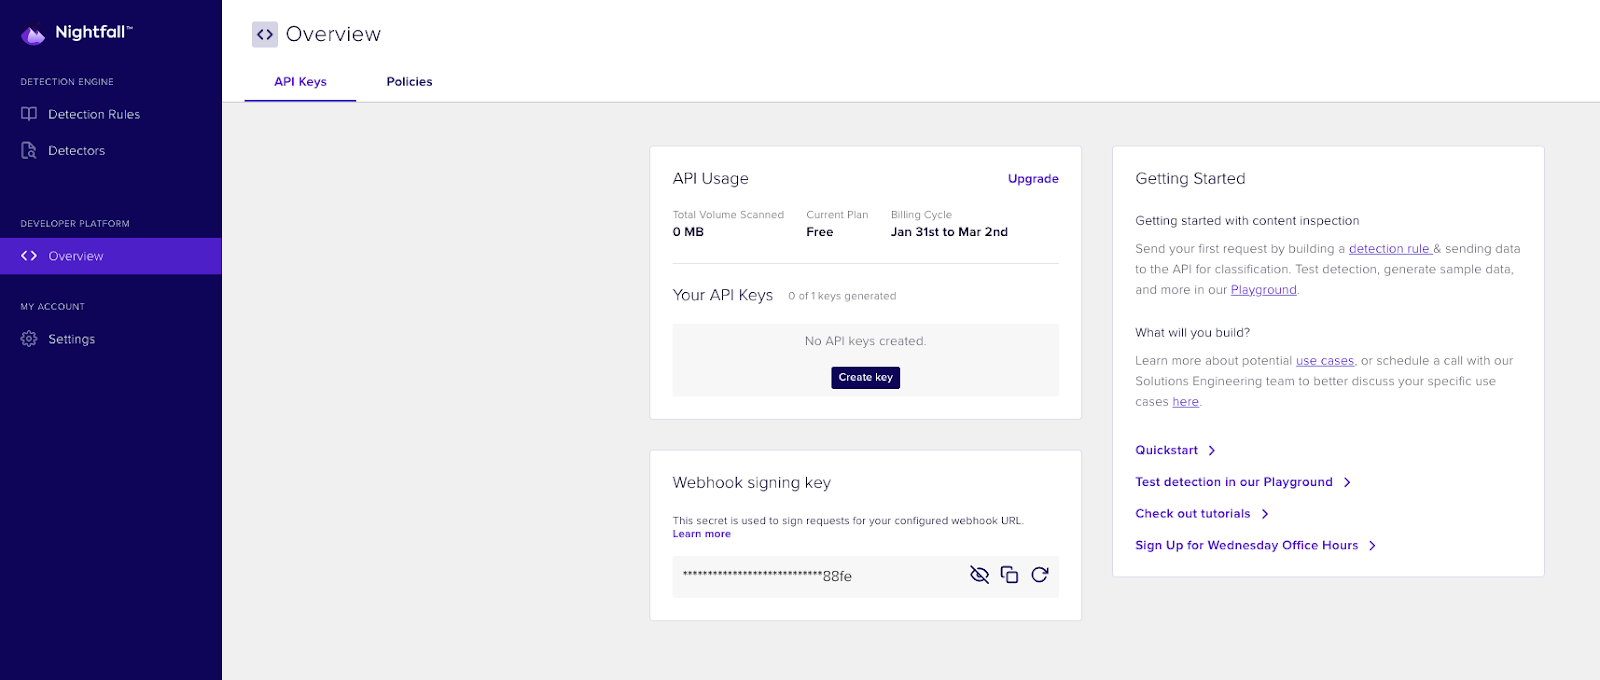
Under the API Keys tab, create an API key, which you will need to run the Nightfall plugin. Under the Policies tab, create a policy with the detection rule(s) you created above. You can also configure where alerts from Nightfall about findings in your logs should be sent, featuring integrations like email, Slack, and HTTP Webhook events.
Running Fluent Bit With the Nightfall Plugin
Docker Image
The Nightfall plugin is available in Fluent Bit versions after 1.9.1, so you can pull directly from the fluent bit repository:
docker pull fluent/fluent-bit
Configuration File
To keep our data pipeline configuration (inputs, parser, filters, outputs) tidy, we will utilize a Fluent Bit configuration file to save our configurations. Note that this file contains secrets in it and should be kept secure. Here is an example configuration file with the Nightfall filter plugin enabled, HTTP and TCP ports as the input sources, and stdout as the output destination.
[INPUT]
name http
host 0.0.0.0
port 8000
[INPUT]
name tcp
host 0.0.0.0
port 5170
format json
tag important_tcp
[INPUT]
name tcp
host 0.0.0.0
port 5200
format json
tag random_tcp
[FILTER]
name nightfall
match important_*
nightfall_api_key <NIGHTFALL_API_KEY>
policy_id <NIGHTFALL_DEV_PLATFORM_POLICY_ID>
sampling_rate 1
tls.verify true
tls.ca_path /etc/ssl/certs
[OUTPUT]
name stdout
match *
Here is more information on each configurable parameter in the Nightfall filter plugin:
- match: A built-in parameter configurable for all Fluent Bit filters. This match rule allows you to only enable this filter for specific input sources. This rule works with the tags you specify for your input sources. It supports both exact and wildcard matches, e.g. important_tcp and important_*. In our example configuration file, only logs from important_tcp would go through the filter and not logs from random_tcp.
- nightfall_api_key: The Nightfall API key that is obtainable through the Developer Platform page in the Nightfall Dashboard.
- policy_id: The ID of the Developer Platform policy that should be used to configure/customize the scanning of your logs
- sampling_rate: The rate controlling how much of your logs you wish to be scanned, must be a float between (0,1]. 1 means that all logs will be scanned. Setting a lower sampling rate can be useful to avoid exceeding rate limits. If you need higher limits, you can upgrade your Developer Platform plan in the Nightfall Dashboard or contact our Customer Support.
- tls.verify: Specifies whether to turn on TLS certificate verification when making requests to Nightfall, which is recommended.
- tls.ca_path: If tls.verify is enabled, the plugin will look for certificates in this path. The default value is /etc/ssl/certs.
Running Fluent Bit
Now we can start up Fluent Bit with the Nightfall plugin by mounting the configuration file with:
docker run --rm -v <PATH_TO_CONFIG_FILE>:/fluent-bit/etc/fluent-bit.conf -p 8000:8000 -p 5170:5170 -p 5200:5200 fluent/fluent-bit
Now we can feed Fluent Bit some data using HTTP and netcat:
echo '{"key 1": 123456789, "key 2": "abcdefg"}' | nc 0.0.0.0 5170
curl -XPOST -H "Content-Type: application/json" -d '{"A":"there is nothing sensitive here","B":[{"A":"my credit card number is 4242 4242 4242 4242"},{"A":"539 21 1934 is my social security."}],"C":false,"key":"kynADfnWAkAV8pkYmtui"}' localhost:8000/important_http
echo '{"key 1": "4242 4242 4242 4242", "key 2": "abcdefg"}' | nc 0.0.0.0 5170
echo '{"key 1": "this will not be scanned 4242 4242 4242 4242", "key 2": "abcdefg"}' | nc 0.0.0.0 5200
Here is the output after running these commands, with all the sensitive portions redacted by the Nightfall plugin. Note that only input sources with tags starting with important_ were scanned. Also note that tags for HTTP inputs can only be set by adding it to the path of the request URL.
[0] important_tcp: [1645588447.945958000, {"key 1"=>123456789, "key 2"=>"abcdefg"}]
[0] important_http: [1645588458.088546000, {"A"=>"there is nothing sensitive here", "B"=>[{"A"=>"my credit card number is *******************"}, {"A"=>"*********** is my social security."}], "C"=>false, "key"=>"********************"}]
[0] important_tcp: [1645588465.619937000, {"key 1"=>"*******************", "key 2"=>"abcdefg"}]
[0] random_tcp: [1645588476.990893000, {"key 1"=>"this will not be scanned 4242 4242 4242 4242", "key 2"=>"abcdefg"}]
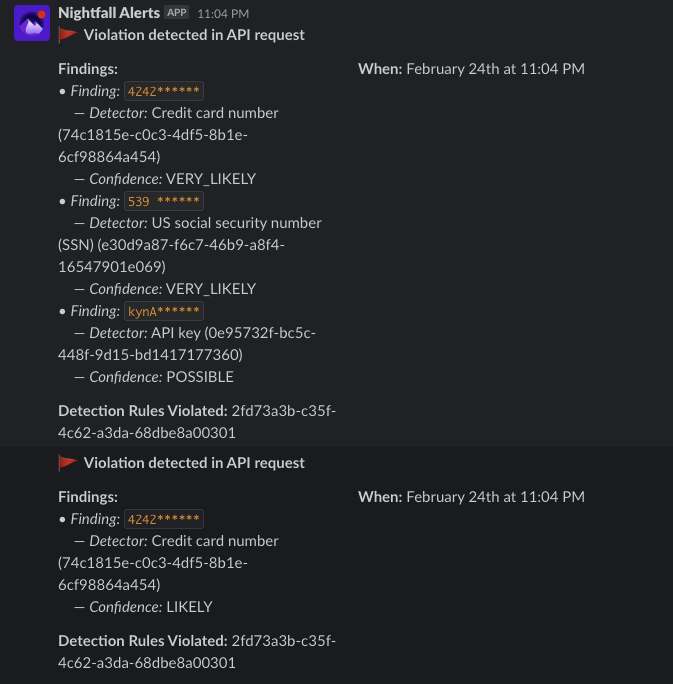
On top of redacting the sensitive portions of the logs, Nightfall also allows you to forward alerts to destinations configured in your policy, including email, Slack, and HTTP webhooks, so you can identify exactly what was leaked in your logs. Here are the Slack alerts after running the commands above:
In this example, we only used rudimentary inputs and outputs like curl, netcat, and stdout. You can extend Fluent Bit by connecting it to any logging platform supported by Fluent Bit, and with Nightfall’s filter plugin you can be assured that those platforms are secured.

.svg)
.svg)


