Blog

The 4 Step Guide to Adding DLP to Communication Services

by
Isaac Madan
,
May 30, 2023
The 4 Step Guide to Adding DLP to Communication ServicesThe 4 Step Guide to Adding DLP to Communication Services
Isaac Madan
May 30, 2023
Icon - Time needed to read this article

With this short guide we will explain how you can add data loss prevention (DLP) as code to communications services like Twilio and SendGrid in a few lines of code, helping ensure your customer communications remain compliant.

Introduction

Transactional email and communication APIs like SendGrid, Twilio, SES, and Mailgun are critical components to modern applications. These services allow developers to easily incorporate end-user communication into their applications without the infrastructural overhead.

However, these services pose a new source of security risk as they can lead to accidental sharing of sensitive data if communications are sent to the wrong users or inadvertently contain sensitive data. Adding data loss prevention (DLP) into your business logic can provide critical capability to classify & protect sensitive data before it exposed, leaked, or stored.

Use Cases

The risk of exposing sensitive data is especially common in situations where these transactional communication services are handling user-generated content like messages between agents and users, or peer-to-peer. Here are a few examples:

Example 1

You're building a grocery delivery application like Instacart. The application allows Shoppers and Customers to send and receive text messages with each other, powered by Twilio. The Customer sends the Shopper a picture of their Driver's License since they won't be home for the delivery, even though their Driver's License needs to be verified in person. Now this image with sensitive PII is processed by Twilio, stored in your application's object store, and viewable by the Shopper and support agents.

Example 2

You're building an application for job seekers to connect with small business owners like restaurants that are hiring, and they can exchange messages over text, powered by Twilio. A malicious user signs up to impersonate a restaurant owner and uses this mechanism to collect PII from job seekers such as their SSN. Now this PII is transmitted by Twilio and is accessible by the attacker.
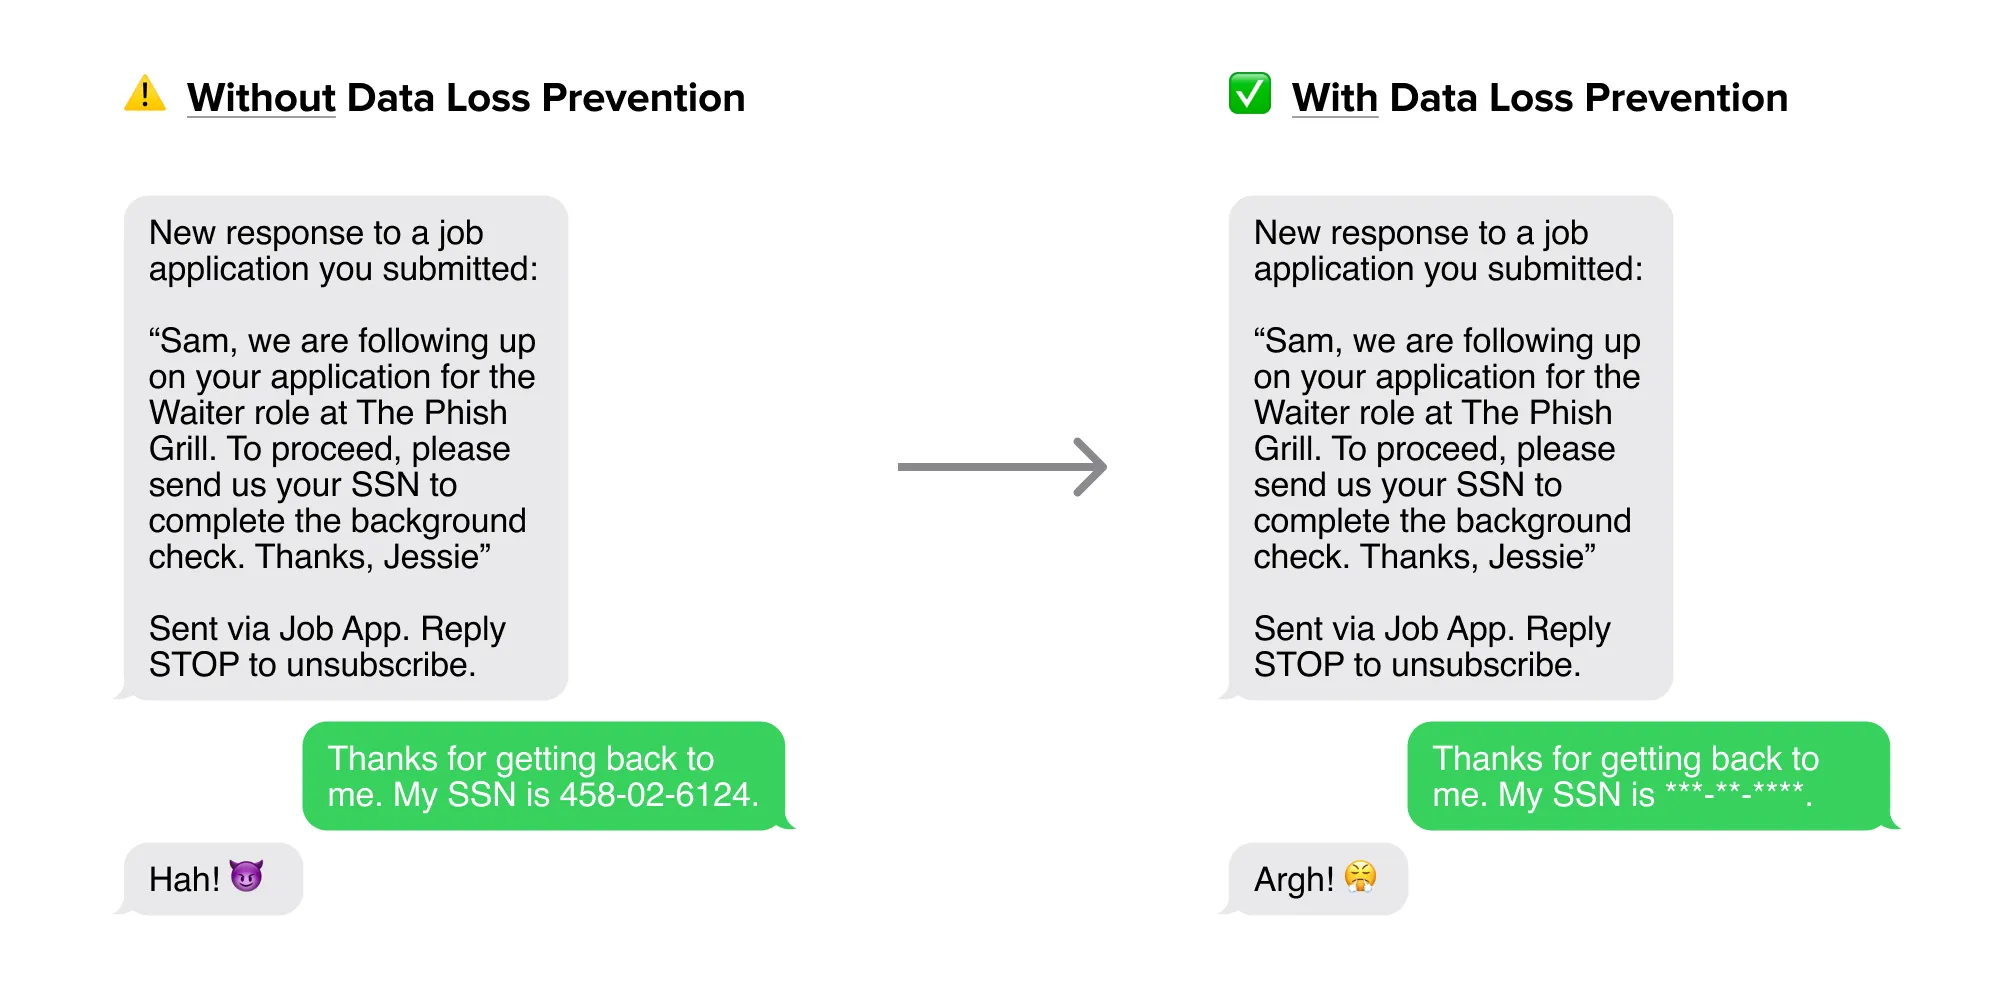
With the Nightfall API, you can scan transactional communications for sensitive data and remediate accordingly. In this post, we’ll describe the pattern behind how to use Nightfall to scan for sensitive data in outgoing emails.

Standard Pattern for Sending Transactional Email/SMS

The typical pattern for using transactional communication services like SendGrid is as follows:

  1. Get an API key and set environment variables
  2. Initialize the SDK client (e.g. SendGrid Python client), or use the API directly to construct a request
  3. Construct your outgoing message, which includes information like the subject, body, recipients, etc.
  4. Use the SendGrid API or SDK client to send the message

Let's look at a simple example in Python. Note how easy it is to send sensitive data, in this case a credit card number.

Python


import os
from twilio.rest import Client

account_sid = os.environ['TWILIO_ACCOUNT_SID']
auth_token = os.environ['TWILIO_AUTH_TOKEN']
client = Client(account_sid, auth_token)

message_body = "4916-6734-7572-5015 is my credit card number"

message = client.messages.create(
                     body=message_body,
                     from_='+15017122661',
                     to='+15558675310'
                 )

print(message.sid)

Adding Sensitive Data Classification/Protection to the Pattern

It is straightforward to update this pattern to use Nightfall to check for sensitive findings and ensure sensitive data isn’t sent out. Here’s how:

Step 1. Setup

Get API keys for both communication service (“CS”) and Nightfall (“NF”), and set environment variables. Learn more about creating a Nightfall API key here.

Step 2. Configure Detection

NF: Create a pre-configured detection rule in the Nightfall dashboard or inline detection rule with Nightfall API or SDK client.

Consider using redaction

Note that if you specify a redaction config, you can automatically get de-identified data back, including a reconstructed, redacted copy of your original payload. Learn more about redaction here.

Step 3. Classify and/or Redact

NF: Send your outgoing message text (and any other metadata like the subject line, etc.) in a request payload to the Nightfall API text scan endpoint. For example, if you are interested in scanning the subject and body of an outgoing email, you can send these both in the input array payload: [ body, subject ]

Text


Nightfall API Response
 
{
  "findings": [
    [
      {
        "finding": "458-02-6124",
       "redactedFinding": "***-**-****",
        "detector": {
          "name": "US Social Security Number",
          "uuid": "e30d9a87-f6c7-46b9-a8f4-16547901e069"
        },
        "confidence": "VERY_LIKELY",
        "location": {
          "byteRange": {
            "start": 39,
            "end": 50
          },
          "codepointRange": {
            "start": 39,
            "end": 50
          }
        },
        "redactedLocation": {
          "byteRange": {
            "start": 39,
            "end": 50
          },
          "codepointRange": {
            "start": 39,
            "end": 50
          }
        },
        "matchedDetectionRuleUUIDs": [],
        "matchedDetectionRules": [
          "My Match Rule"
        ]
      }
    ]
  ],
  "redactedPayload": [
    "Thanks for getting back to me. My SSN is ***-**-****."
  ]
}

Step 4. Handle Response and Send

  • Review response to see if Nightfall has returned sensitive findings:
    • If there are sensitive findings:
      • You can choose to specify a redaction config in your request so that sensitive findings are redacted automatically
      • Without a redaction config, you can simply break out of the conditional statement, throw an exception, etc.
    • If no sensitive findings or you chose to redact findings with a redaction config:
      • Initialize the SDK client (e.g. SendGrid Python client), or use the API directly to construct a request
      • Construct your outgoing message, which includes information like the subject, body, recipients, etc.
        • If you specified a redaction config and want to replace raw sensitive findings with redacted ones, use the redacted payload that Nightfall returns to you
      • Use the SendGrid API or SDK client to send the sanitized message

Python Example

Let's take a look at what this would look like in a Python example using the Twilio and Nightfall Python SDKs in just 12 lines of code (with comments and formatting added for clarity):

Python


import os
from twilio.rest import Client
from nightfall import Confidence, DetectionRule, Detector, RedactionConfig, MaskConfig, Nightfall

# Initialize the Twilio and Nightfall clients
account_sid = os.environ['TWILIO_ACCOUNT_SID']
auth_token = os.environ['TWILIO_AUTH_TOKEN']
client = Client(account_sid, auth_token)

nightfall = Nightfall() # By default Nightfall will read the NIGHTFALL_API_KEY environment variable

# The message you intend to send
payload = [ "4916-6734-7572-5015 is my credit card number" ]

# Send the message to Nightfall to scan it for sensitive data
# Nightfall returns the sensitive findings, and a copy of your input payload with sensitive data redacted
findings, redacted_payload = nightfall.scan_text(
                        payload,
                        [ DetectionRule([ # Define an inline detection rule that looks for Likely Credit Card Numbers
                            Detector(
                                min_confidence=Confidence.LIKELY,
                                nightfall_detector="CREDIT_CARD_NUMBER",
                                display_name="Credit Card Number",
                                redaction_config=RedactionConfig(
                                    remove_finding=False, 
                                    substitution_phrase="[Redacted]")
                            )])
                        ])

# If the message has sensitive data, use the redacted version, otherwise use the original message
if redacted_payload[0]:
    message_body = redacted_payload[0]
else:
    message_body = payload[0]

print(message_body)

# Send the sanitized message body via Twilio
message = client.messages.create(
                     body=message_body,
                     from_='+15017122661',
                     to='+15558675310'
                 )

print(message.sid)

You'll see that the message we originally intended to send had sensitive data:

4916-6734-7572-5015 is my credit card number

And the message we ultimately sent was redacted!

[Redacted] is my credit card number

Adapting to Inbound Communications

Services like Twilio and SendGrid also support inbound communications from end-users, typically via webhook. Meaning inbound messages will be sent to a webhook handler that you specify. Hence, you would insert the above logic in your webhook handler upon receipt of an event payload.

Now that you understand the pattern, give it a shot!

On this page
Nightfall Mini Logo

Getting started is easy

Install in minutes to start protecting your sensitive data.

Get a demo